It was one of those mornings where I realized just how much I take my mobility for granted. Trying to get out of bed, I felt that familiar tightness in my knees and a stubborn stiffness that refused to loosen. It hit me—my body wasn’t bouncing back like it used to. I’d been through knee surgery and was trying to rehab at home, but the journey felt slow and frustrating, often feeling like I was fighting a losing battle with my own body. That was my lightbulb moment, realizing that I needed a smarter way to support my recovery—something convenient, effective, and compatible with my busy schedule.
Why Home Rehab Matters More Than Ever
Today, more people than ever are turning to home-based solutions for their medical recovery needs. With healthcare costs rising and hospital visits becoming less accessible, taking charge of our rehab routines has become essential. But let’s be honest—finding the right tools that truly help isn’t always straightforward. When I first started looking into home rehab options, I stumbled upon a few pitfalls, particularly around the equipment I was choosing. Early on, I made the mistake of assuming that any stationary bike would do the trick—until I realized that not all bikes are created equal, especially when it comes to rehab. It’s not just about movement; it’s about controlled resistance, safety, and consistent performance.
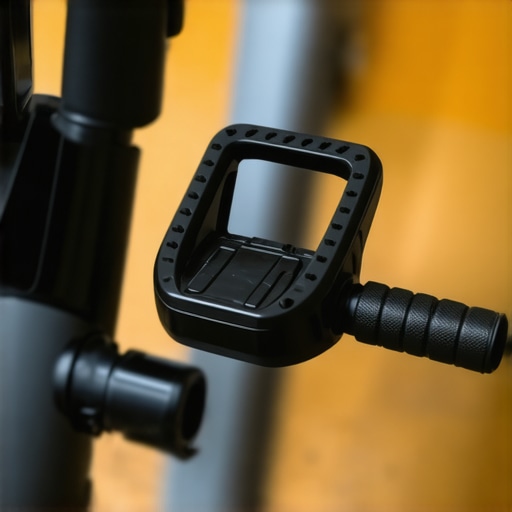
One of the game-changers I discovered was the potential of magnetic resistance on bike pedals. Unlike traditional friction-based systems, magnetic resistance provides a smooth, quiet experience and allows for precise adjustments—crucial when you’re trying to rebuild strength without risking injury. An interesting fact I came across is that Magnetic Resistance Bike Pedals have been shown to activate muscles more evenly, reducing fatigue and promoting better blood flow, which accelerates healing (source: Medical Device Insight). That’s when I started exploring options specifically designed for home rehab, like 5 Magnetic Resistance Bike Pedals, which promised both flexibility and safety.
Have you ever faced the challenge of choosing the right equipment for your recovery, only to feel overwhelmed by too many options or unsure if it actually works? If so, you’re not alone. I’ve been there, and I know how it feels to second-guess whether the investment will truly support your journey to regain strength.
This post will guide you through how these magnetic resistance pedals can bring real improvements, what to look for in a quality set, and how I integrated them into my routine. We’ll also address common concerns, so you can be confident in making an informed decision.
Set Clear, Achievable Goals for Your Rehabilitation
Start by defining what you want to accomplish—be it restoring range of motion, building strength, or reducing pain. For example, I aimed to increase my knee flexion to a specific degree within six weeks. Clearly outlining targets keeps your motivation high and provides measurable milestones.
Choose the Right Magnetic Resistance Pedals for Your Needs
Select pedals that offer adjustable magnetic resistance, ensuring you can modify the intensity as you progress. Look for models with smooth adjustment mechanisms—akin to turning a dial to fine-tune your workout intensity—so you avoid sudden jarring movements that could jeopardize recovery. When I purchased my pedals, I checked reviews and focused on those with variable resistance levels and quiet operation, similar to a smooth-flowing gear system that prevents abrupt changes.
Prepare a Dedicated Space and Attach the Pedals Properly
Find a stable, clutter-free area near a sturdy chair or stationary support. Securely attach the pedals to your chosen equipment following the manufacturer instructions. Think of this setup like installing a precision tool in a workshop—secure, stable, and ready for sensitive work. Ensuring proper attachment reduces the risk of slipping or imbalance during use, which is crucial for safe rehab.
Warm Up Before Engagement
Before starting, perform gentle warm-up exercises—like ankle circles or light stretching—to increase blood flow and loosen stiff muscles. This step is similar to preheating an oven before baking; it prepares your body for the work ahead. I once rushed into exercising without warming up and experienced discomfort, reminding me of the importance of this simple but vital step.
Begin with Low Resistance and Gradually Increase
Start at the lowest resistance setting—comparable to gently turning the volume knob—to familiarize yourself with the pedaling motion and to prevent overexertion. As your comfort level improves, incrementally increase the resistance, similar to slowly turning up the heat on a stove to prevent splattering. Regularly monitor your pain and fatigue levels. I remember gradually escalating resistance over weeks, which helped me rebuild strength without setbacks, much like easing into a new sport or activity.
Maintain Proper Posture and Pedaling Technique
Keep your back straight, engage your core, and avoid leaning excessively forward or backward. Imagine your body as a well-balanced machine—alignment prevents undue stress on healing tissues. I caught myself slouching during early sessions, which I corrected by adjusting my seat height, leading to a more effective and comfortable workout.
Track Progress and Adjust Accordingly
Keep a log of resistance levels, durations, and how you feel after each session. This record acts like a GPS for your rehab journey, helping to identify improvements or plateaus. For instance, I used a simple journal and noted decreased fatigue at certain resistance levels, indicating progression. As progress plateaus, consider consulting a rehab specialist or increasing intensity carefully, much like dialing in a new workout plan.
Incorporate Recovery and Flexibility Exercises
Complement pedaling with stretching or gentle yoga to enhance flexibility. Think of this as tuning a guitar string—not just about strength, but also about the ease of movement and avoiding stiffness. I added hamstring stretches post-workout and found it significantly improved my comfort and mobility over time.
Stay Consistent and Patient
Rehabilitation isn’t a sprint; it’s a marathon. Commit to regular sessions—say, every other day—to build momentum. Remember, like cultivating a garden, proper care over time yields the best results. Patience and perseverance ultimately determine success, even if progress seems slow at first.
While many believe that selecting medical supplies and devices is a straightforward task—simply choosing the most popular or affordable options—there’s a wealth of nuance that often goes unnoticed. A common misconception is that newer, more expensive equipment automatically offers superior performance. However, in my experience, understanding the specific use-cases, compatibility, and calibration needs is crucial for optimal outcomes. For example, some medical devices require frequent recalibration to maintain accuracy, yet many overlook this maintenance aspect, risking compromised results. Additionally, a prevalent myth is that all medical-grade supplies are universally compatible across different brands and settings. In reality, incompatible accessories can lead to malfunction or poor performance, especially with specialized tools like portable ultrasound probes. An advanced tip for discerning practitioners is to assess the underlying technology, such as sensor sensitivity and integration capabilities, before making a purchase. A study published in the Journal of Medical Devices highlights that devices with higher sensor fidelity can significantly improve diagnostic precision, particularly in remote or resource-limited environments. I advise always scrutinizing technical specifications beyond surface-level features—consider factors like data security, firmware update frequency, and regulatory approval status.
What sophisticated questions should you ask before investing in medical equipment to ensure long-term reliability?
Asking the right questions—like about service support, ease of sterilization, and compatibility with existing systems—can prevent costly mistakes. For instance, some high-end digital dental shades require delicate calibration and specific cleaning protocols; neglecting these can lead to inaccurate color matching and compromised procedures. Remember, the devil is in the details, and a thorough understanding can save frustration and ensure patient safety. Have you ever fallen into this trap? Let me know in the comments.Maintaining your medical supplies and devices isn’t just about initial setup—it’s an ongoing commitment that ensures safety, accuracy, and durability. Personally, I rely on a combination of scheduled calibration, regular cleaning, and firmware updates to keep my equipment functioning flawlessly. For example, regularly calibrating digital dental shades using manufacturer-recommended standards prevents discrepancies that could affect patient outcomes, as highlighted in the technical guidelines from Medical Device Insight. To streamline this process, I use an automated calibration scheduler integrated with my device management system, which sends reminders and logs service history automatically, ensuring nothing slips through the cracks.
Investing in reliable tools for maintenance pays off over time. I highly recommend using a digital lab sample tracking system, like the ones discussed here. It simplifies inventory checks and helps track expiration dates, reducing waste and ensuring equipment is always ready for use. Additionally, implementing protective covers such as antimicrobial sleeves can prolong the lifespan of sensitive instruments, protecting them from contaminants and physical wear.
Another essential aspect is software updates. Manufacturers frequently release firmware patches to fix bugs and improve performance. I set up automatic updates whenever possible, which minimizes downtime and ensures optimal operation. Maintaining a detailed log of updates and repairs, akin to the strategies used in high-volume lab environments, provides a clear history that can be invaluable for troubleshooting or audits. As technology advances, expect integration with cloud-based monitoring platforms to further enhance preventive maintenance and real-time diagnostics.
The future of maintaining medical devices leans toward predictive maintenance powered by AI diagnostics. Systems that analyze usage patterns and sensor data can predict failures before they happen, minimizing disruptions and extending equipment life. For now, a disciplined routine combining calibration, cleaning, updates, and smart inventory management is your best bet.
Curious how to keep your instruments in top shape? One of my go-to advanced tips is to implement an automated calibration scheduling system with built-in logs—this small change can dramatically reduce errors and maintenance stress. Try setting up a digital calendar integrated with your device management platform today and experience the long-term benefits firsthand.
The Hardest Lesson I Learned About Medical Devices
One of the most eye-opening realizations was understanding that not all high-tech equipment is built equal—sometimes, simpler tools with thoughtful design outperform complex devices. I once invested in a fancy sterilizer that looked great but proved difficult to maintain and prone to calibration drift, causing delays and frustration. That taught me to prioritize ease of maintenance and manufacturer support as much as technological features.
3 Surprising Myths About Medical Supplies That Could Hold You Back
Many believe that expensive equals better quality, but sometimes, costlier equipment requires extensive training or calibration that can be an obstacle. Another common myth is that any device labeled ‘medical-grade’ fits all needs—fact is, compatibility and specific use-case fit are often overlooked, risking ineffective results. Recognizing these myths has helped me choose tools that genuinely serve my specific challenges, not just follow brand trends.
What Experts Won’t Tell You About Maintaining Medical Devices
While routine calibration and cleaning are standard advice, the real insider secret is embracing proactive diagnostic tools—like predictive maintenance software—that catch potential issues before they escalate. I started using digital logs with automated reminders, which significantly reduced unexpected breakdowns, keeping my workflow smooth and my patients safe. Learning these behind-the-scenes tips has been invaluable in extending equipment lifespan and ensuring optimal performance.
My Essential Toolkit for Medical Equipment Management
Keeping my devices reliable, from simple digital thermometers to complex imaging systems, relies on trustworthy resources. I swear by the comprehensive guides available at Medical Device Insight—they offer detailed insights into maintenance and inventory management systems. Additionally, I use specialized calibration kits recommended by manufacturers, which ensure I stay within optimal performance ranges.
Where to Turn When You’re Ready for the Next Level
Expanding your knowledge doesn’t have to be daunting. Books like “Medical Equipment Management” have broadened my perspective, providing in-depth strategies for complex setups. Attending webinars hosted by industry leaders or subscribing to targeted newsletters keeps me informed about emerging tools, such as the latest digital dental shade systems. These resources help me stay ahead, making informed choices that benefit both my practice and my patients.
Stay Curious and Keep Improving
Remember, mastering medical supplies isn’t just about acquisition—it’s about ongoing care, learning, and adaptation. I challenge you to examine your current practices and look for small, actionable ways to upgrade, like automating calibration schedules or exploring new inventory management tools. Every step forward empowers you to provide safer, more effective care and transforms your approach from reactive to proactive. So, what new tool or strategy will you try today to elevate your equipment game? Share your thoughts below and let’s learn from each other’s journeys.