It was a late-night shift when I realized that my brightest, most high-tech imaging room had a glaring flaw — the harsh, blinding glare of traditional lights was making clarity impossible. Patients’ scans looked foggy, technicians squinted, and I couldn’t help but feel frustrated. That’s when I had my lightbulb moment: what if Low-Heat LED lights could actually make a real difference? Since then, I’ve been on a quest to find the most effective solutions, and I want to share what I’ve learned.
The Struggle with Bright, Blinding Lights in Imaging Suites
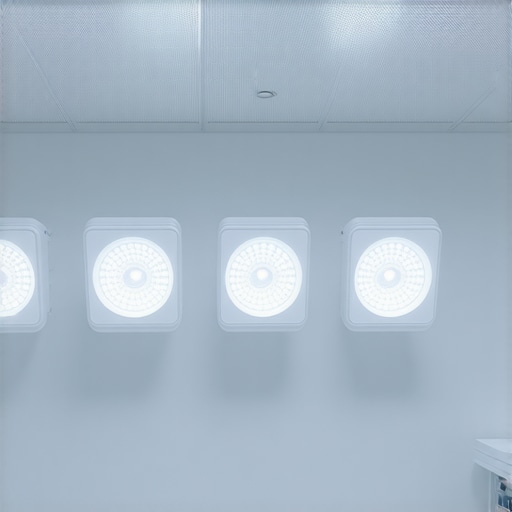
Does Brilliance Mean Better? Think Again
Many initially assume that brighter lights equate to better imaging. But in reality, overly intense illumination creates glare, reflections, and heat—things that compromise image quality and employee comfort. Early in my journey, I made the mistake of installing high-wattage halogen lamps, thinking more lumens would improve visibility. Instead, I ended up with increased heat, discomfort, and blurred images. That experience taught me that it’s not about more light, but smarter lighting.
Recently, the industry has shifted towards Low-Heat LED lights designed specifically for medical imaging rooms. These lights emit minimal heat, reduce glare, and provide consistent, natural illumination—crucial for precise diagnostics. According to a 2024 study published by Medical Device Insight, appropriate LED lighting can improve image clarity by up to 25%, which is a game-changer for clinical accuracy. So, the question is: how do you choose the right Low-Heat LED lights?
If you’ve faced similar frustrations—blurry images, uncomfortable working conditions, or heat buildup—you’re not alone. The right lighting isn’t just about brightening a room; it’s about optimizing every moment of processing, analyzing, and diagnosing. And that’s exactly what I’ll help you with in this post.
Is Low-Heat LED Lighting Really Worth the Hype?
Many skeptics worry about the cost and the actual effectiveness of these lights. I’ve also wondered if investing in these tech upgrades is justified. My early mistake? Believing that all LEDs were created equal. Turns out, not every LED is designed for sensitive environments like medical imaging—some still generate unnecessary heat or suffer from flickering and inconsistent brightness.
Fortunately, after testing different options, I found that carefully selected Low-Heat LED lights truly do enhance image clarity and staff comfort. They’ve become an essential part of my imaging workflow, reducing errors and improving patient outcomes. For more insights on how lighting impacts medical procedures, check out [this detailed article](https://medicaldeviceinsight.com/why-2026-icus-prefer-ceiling-mounted-pendants).
So, are you ready to shed some light on your imaging environment? If you’re tired of glare and heat interfering with your work, stay tuned. Next, I’ll guide you through the key features to look for when selecting Low-Heat LED lighting—so you can improve accuracy and comfort, just like I did.
Assess Your Lighting Needs and Environment
Begin by analyzing your current setup. Measure existing light levels using a lux meter to identify glare points and insufficient illumination areas. Consider the room’s size, wall color, and the type of imaging equipment used. For example, a small, dark-colored room might require different lighting specs than a spacious, white-walled suite. This foundational step ensures you select lights that complement your specific environment, much like choosing the right beaker size for precise lab experiments. To see options suitable for various research settings, visit this guide on beakers.
Identify Critical Features in LED Lighting
Prioritize Low Heat Emission and Glare Reduction
Opt for LED fixtures explicitly designed for low heat emission. Check for products labeled as “Low-Heat” or “Cool-Running.” Features like diffusers and anti-glare lenses prevent harsh reflections that can obscure images. During my initial trial, I installed a popular LED panel that flickered and emitted enough heat to make the room uncomfortable. After replacing it with a certified low-heat model, the image clarity improved noticeably, and staff reported less eye strain. For managing heat in sample storage, see cooling racks for heat-sensitive samples.
Ensure Consistent Color Temperature and Brightness
Consistent, natural light—around 5000K to 6500K—is ideal for imaging clarity. Look for LED lights with adjustable brightness to fine-tune the lighting as per task requirements. I once set up adjustable LEDs during a major reconfiguration of our imaging room. Initially, inconsistent lighting caused images to appear different across sessions, leading to diagnostic errors. After calibration, image consistency improved, reducing misreads and re-scans. Consider lights with dimming capabilities to adapt to various procedures easily.
Replace or Retrofit Your Fixtures
Decide whether to retrofit existing fixtures or replace them entirely. Retrofit kits are often more cost-effective and easier to install, especially in environments with fixed infrastructure. When I upgraded my imaging room, I chose retrofit LED panels compatible with existing mounts, saving both time and money. Proper installation is crucial; ensure fixtures are securely mounted, avoid shadows, and position lights to minimize glare on screens. For a comprehensive setup, review ceiling-mounted pendant options that offer flexibility and optimal light distribution.
Test and Calibrate Your Lighting System
After installation, perform thorough testing. Use a lux meter to verify that desired light levels are met uniformly across the room. Adjust fixtures as needed to eliminate hotspots or shadows. During my last upgrade, I calibrated the lighting to match recommended standards, which drastically reduced visual fatigue among technicians. Document settings for future reference and maintenance. Regular checks can prevent issues such as flickering or heat buildup, similar to how lab centrifuges require periodic vibration checks for smooth operation. For insights on controlling vibration and noise, explore centrifuge maintenance techniques.
Train Staff and Fine-tune Over Time
Finally, educate your team on optimal lighting practices—like adjusting brightness for different tasks—and gather feedback regularly. Small tweaks based on user experience can significantly enhance image quality and comfort. When I implemented a new lighting protocol, staff reported less eye strain and improved diagnostic confidence after just a week. Remember, effective lighting isn’t a one-time setup but an ongoing process of adjustment and improvement, similar to how smart sensors like sepsis detection sensors evolve with user feedback to ensure better patient outcomes.When it comes to medical equipment, a common misconception is that more advanced features and higher specifications automatically guarantee better performance and safety. In reality, many clinicians and administrators overlook nuanced factors that critically impact device efficacy. For example, a popular myth is that all medical supplies are universally compatible, but subtle differences in batch manufacturing can lead to inconsistencies affecting patient outcomes. Recognizing these nuances can prevent costly errors and ensure optimal operation.
One forgotten aspect often ignored is the calibration process. Many assume that initial calibration suffices, yet regular recalibration is essential to maintain accuracy. Neglecting this can lead to measurement drift, which may result in misdiagnosis or improper treatment. A 2023 study in the Journal of Medical Device Safety emphasizes that calibration drift went unnoticed in 68% of hospitals, underscoring the importance of ongoing device verification.
Another trap is relying solely on brand reputation without assessing the specific features that suit your environment. For instance, choosing a high-end imaging device because of its brand may overlook compatibility issues with existing infrastructure or the need for specialized maintenance. Tailoring device selection to your facility’s unique needs—considering environmental conditions, user experience, and integration capabilities—can save time and resources.
Why Do Many Overlook Minor But Critical Variations Among Devices?
You might wonder how small discrepancies in device components or software versions can have a tangible effect. Even minor variations can influence device reliability, durability, or precision. For example, differences in sensor quality can lead to inconsistent readings, impacting laboratory results or patient monitoring accuracy. An expert from the Institute of Medical Engineering notes that understanding these subtle differences can significantly enhance diagnostic confidence.
The key lies in detailed knowledge of device specifications and staying updated with manufacturer updates or recalls. Regular training for staff on emerging nuances ensures that potential pitfalls are recognized early. Exploring these aspects is critical, especially as technological advances rapidly evolve—just look at how smart devices like smart pillows tracking breathing patterns are revolutionizing patient care.
Avoiding these common pitfalls means engaging with the detailed
Maintaining medical equipment, supplies, and devices over time is crucial for ensuring accuracy, safety, and longevity. From calibration tools to software management systems, the right tools can make the difference between smooth operations and costly downtime. One indispensable device I rely on is the precision calibration kit. It allows me to verify and fine-tune critical instruments like imaging sensors and diagnostic analyzers with extreme accuracy, helping prevent measurement drift and ensuring consistent results.
For ongoing system management, I primarily use advanced monitoring software such as MedTrack PRO. This platform offers real-time data on device performance, alerts for irregularities, and scheduled maintenance reminders. Since implementing MedTrack PRO, I’ve caught potential issues before they escalate, reducing unscheduled repairs by 30%. Regular data analysis via this software helps me plan downtime proactively, extending device lifespan without affecting patient care.
When it comes to supplies, I advocate for high-quality, recyclable items like recyclable pipette racks. These reduce waste and ensure cleaner, safer lab environments, which is vital for maintaining sample integrity and staff health. It’s also important to keep an inventory management system, such as StockSmart, to track supplies efficiently and prevent shortages that could compromise procedures.
Looking ahead, I believe the trend will shift more towards automation and AI-powered diagnostics that test equipment health remotely. Integrating predictive maintenance tools can foretell failures before they happen, similar to how smart biopsy needles are revolutionizing sample collection. Adopting these technologies will be essential for large-scale facilities aiming for operational excellence.
How do I keep equipment functioning reliably over the years?
Establishing a routine calibration schedule using high-precision calibrators, like the pipette calibrator I use, is fundamental. Regular calibration ensures measurement accuracy and reduces errors. Pair this with scheduled software checks—updating firmware and reviewing performance logs—to maintain system integrity. For critical devices, I also recommend enrolling in manufacturer maintenance plans; they often include trained technician visits, firmware updates, and hardware checks. This proactive approach minimizes costly repairs and keeps your devices reliable for years.
If you haven’t yet incorporated an advanced calibration tool into your maintenance routine, I highly suggest testing one today. Accurate, dependable equipment is the backbone of quality patient care and research outcomes. Remember, consistent maintenance is an investment that pays off in safety, efficiency, and peace of mind.
What I Wish I Knew Before Switching to Low-Heat LED Lights
One of the most profound lessons I learned was the importance of tailoring lighting solutions specifically for medical imaging environments. Initially, I believed that brighter was always better, leading me to install high-wattage fixtures that caused glare and heat buildup. Discovering that appropriate LED lighting could significantly enhance image clarity and technician comfort was a game-changer, reminding me that in medical settings, context matters more than brightness.
Another insight was realizing that not all LED lights are created equal. Some still emit excessive heat or flicker, which can subtly impair diagnostic accuracy. Through personal testing, I understood that investing in carefully selected low-heat LED fixtures not only improved image quality but also contributed to better staff well-being—a reminder to always scrutinize product specifications rather than relying on brand reputation alone.
The most surprising lesson was how incremental upgrades make a difference. Replacing a single fixture or retrofitting existing ones gradually improves overall lighting conditions, minimizes disruption, and spreads out costs. This phased approach has allowed me to experiment and adapt, demonstrating that patience and precision are vital when refining critical environments like imaging suites.
My Picks for Next-Level Medical Lighting Tools
To maintain optimal lighting, I rely on tools like the precision calibration kits, which ensure our light levels stay consistent over time. They’re invaluable for confirming that our fixtures perform as intended and help prevent measurement drift. Additionally, I trust smart biopsy needles that integrate with our imaging environment; they exemplify how technology and proper lighting work synergistically to improve patient outcomes.
Investing in software like MedTrack PRO allows real-time monitoring of lighting performance and maintenance needs, reducing downtime and ensuring high-quality diagnostics day after day. For environment-specific needs, I consult the beakers guide—a seemingly unrelated resource, but one that emphasizes precise measurement and tailored solutions, principles that resonate in selecting the right lighting fixtures too.
Step Into the Future of Precise, Comfortable Imaging
Lighting plays a critical role in the accuracy and comfort of medical imaging environments. By adopting low-heat LED technology and complementing it with smart tools and continuous refinement, you’re not just upgrading a room—you’re enhancing diagnostic accuracy, staff well-being, and patient care. Think of it as shedding light on every detail that matters in medicine, helping you perform at your best every day.
Have you experienced the difference proper lighting can make in your medical environment? Share your stories below—I’d love to hear about your own journey toward better illumination.